Getting your app into the App Store is a crucial step in your app release plan. You should expect this process to take several days. While these won't be days of pure effort toward submitting the app, there will be periods of waiting on Apple to verify both your account and app. You'll also need to prepare screenshots and text descriptions in order to submit your app properly.
Reading this step-by-step guide will help you prepare the right information ahead of time and minimize surprises along the way. There are two main steps: setting up your App Store account and releasing your app build.
Setting Up Your App Store Account
Here's what you'll need before you start setting up your App Store account:
1. Your Legal Entity Status - Your entity name must correspond with the tax ID you plan to use. It will also appear on your product page for any apps you distribute. Example: Seller: ABC Company, Inc.
2. A Website - Your organization’s website must be publicly available, and the domain name must be associated with your organization.
3. The Authority to Sign Legal Agreements from your Organization - As the person enrolling your organization, you must have the legal authority to bind your organization to legal agreements. If this doesn't describe you, make sure you have someone with this authority with you when you Enroll in the Apple Developer Program.
4. Organization Contact Info - You need to have an email with the domain from your website to use in official business functions, as well as some sort of business phone number. An address is also needed.
5.
A D-U-N-S® (Dun and Bradstreet) Number - These unique nine-digit numbers are assigned by Dun & Bradstreet and are widely used as standard business identifiers. You can check to see if your organization already has a D-U-N-S® Number
here and request one if necessary
here.
Now that you’ve completed your preparations, it’s time to set up your account!
First, create an Apple ID
here. (Note that you need to enter an email and phone number for two-factor authentication. You can use a Gmail address as your username if you prefer, or you can skip this whole step and use an existing Apple ID.) You will be sent six-digit codes to verify your email and then your phone number.
Next, log in using your Apple ID and password.
Now, you can enroll in the apple developer program
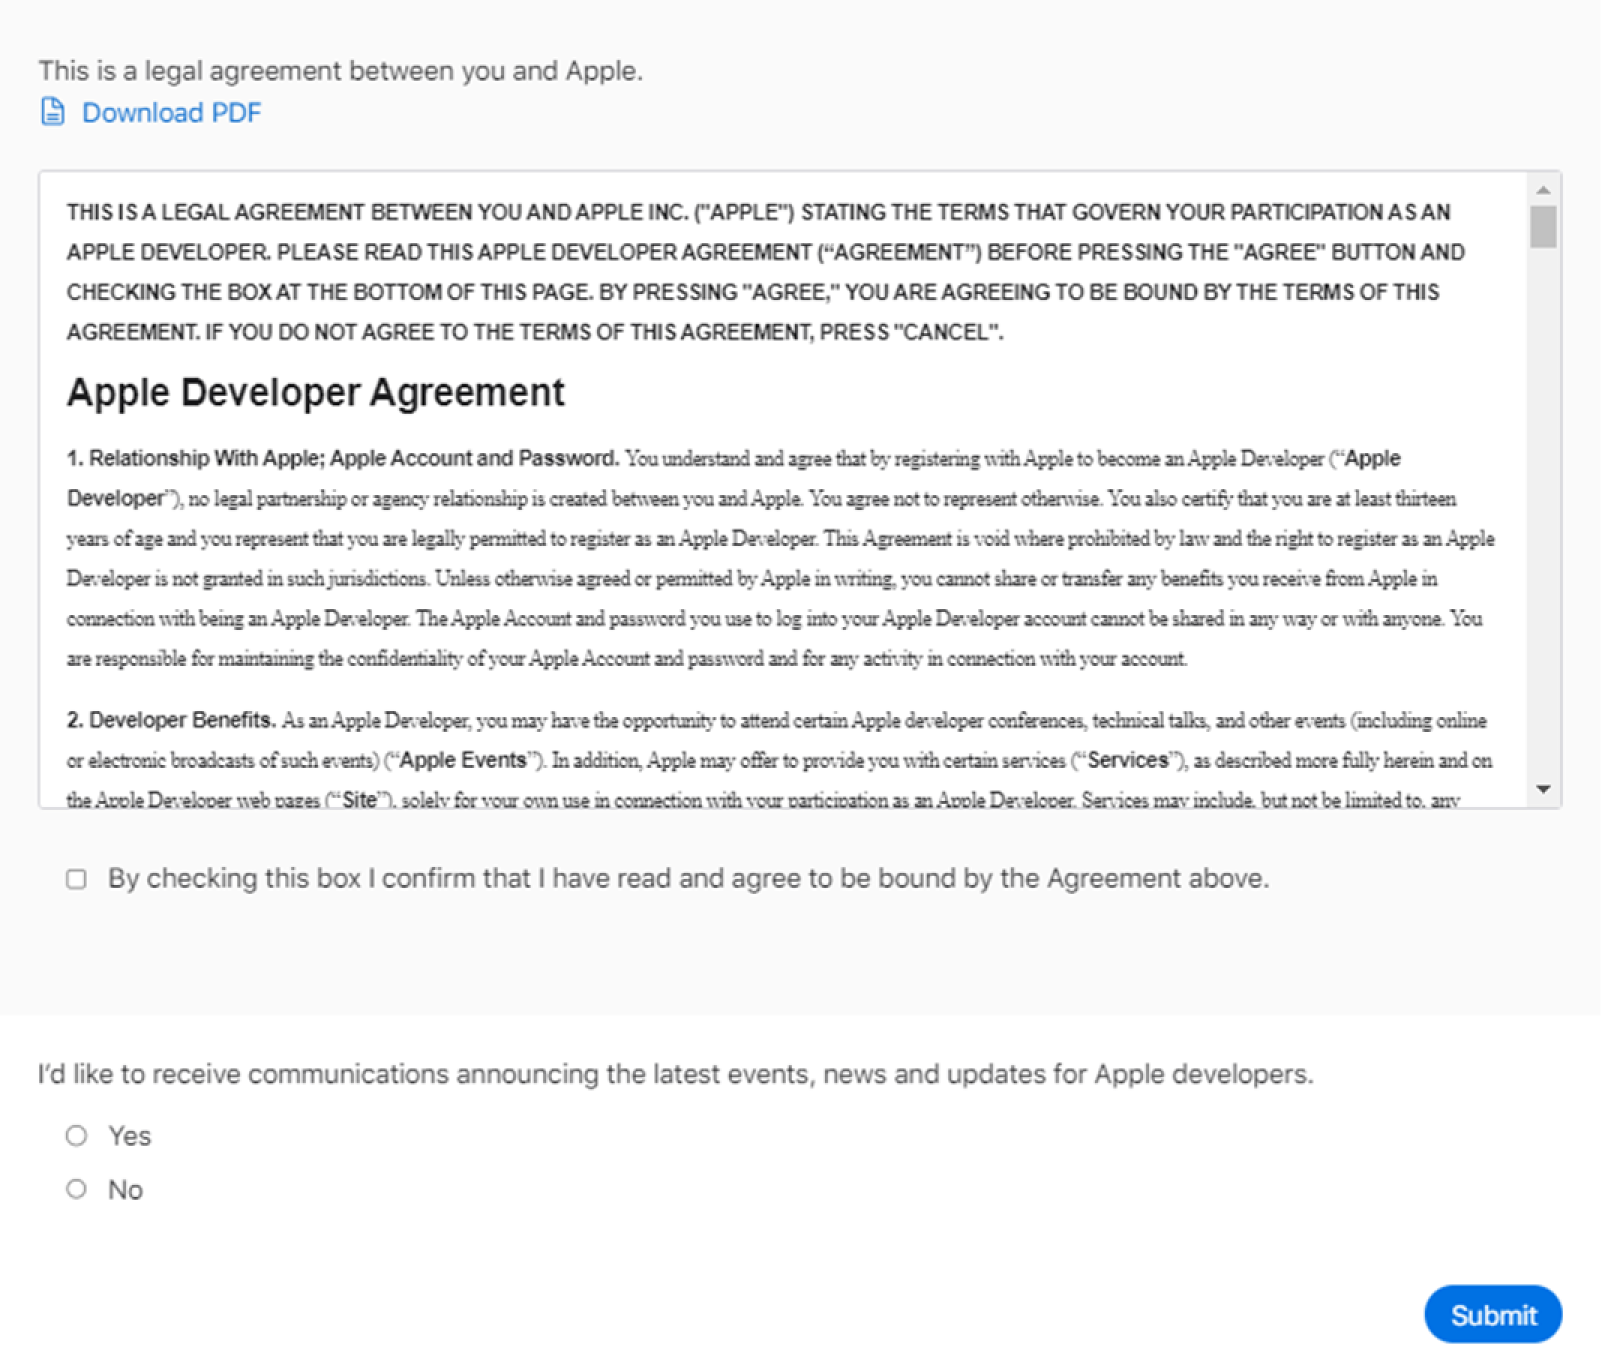
here. Once you log in, you’ll be redirected to a page where you’ll be asked to affirm the Apple Development Agreement.
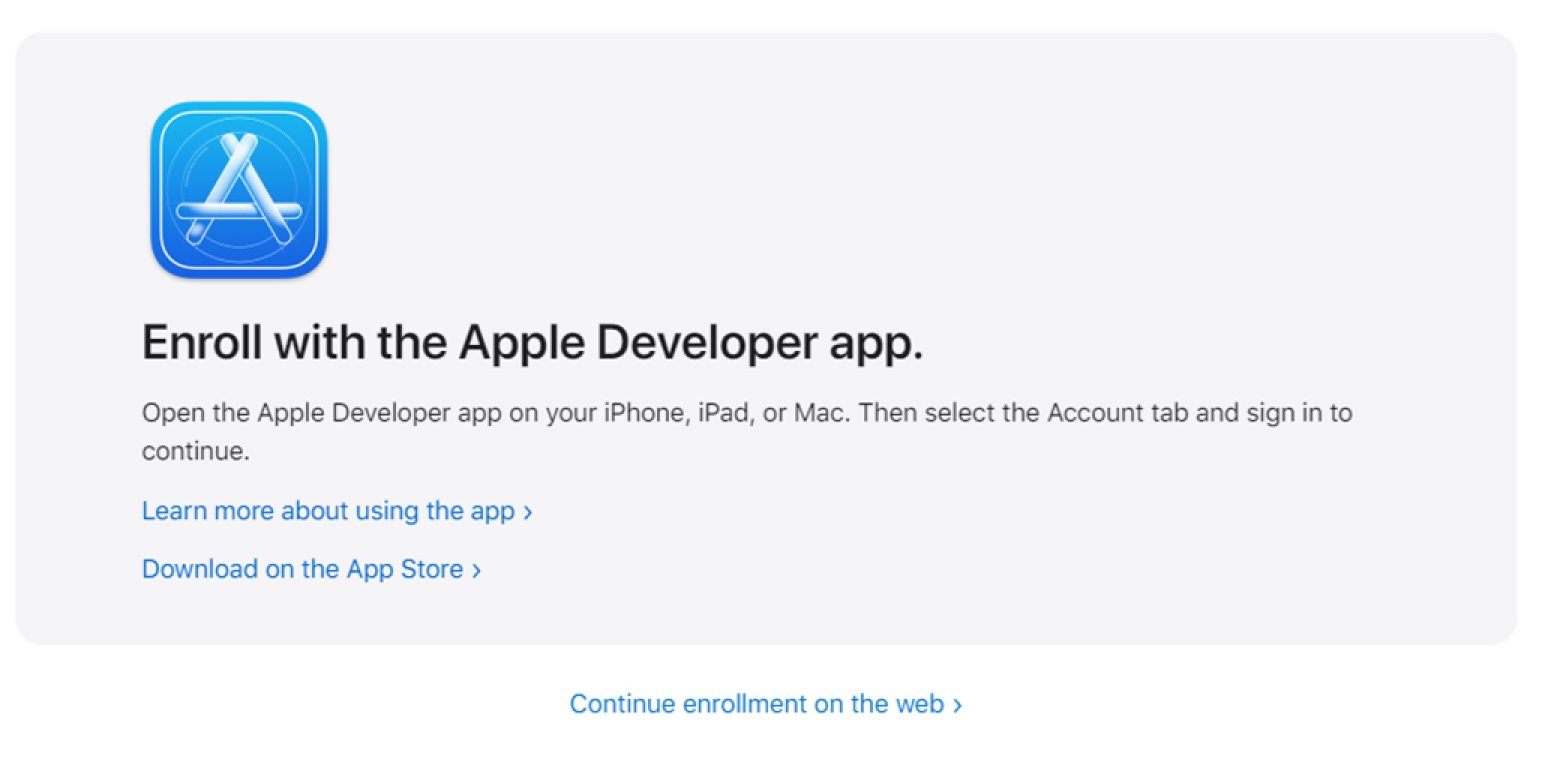
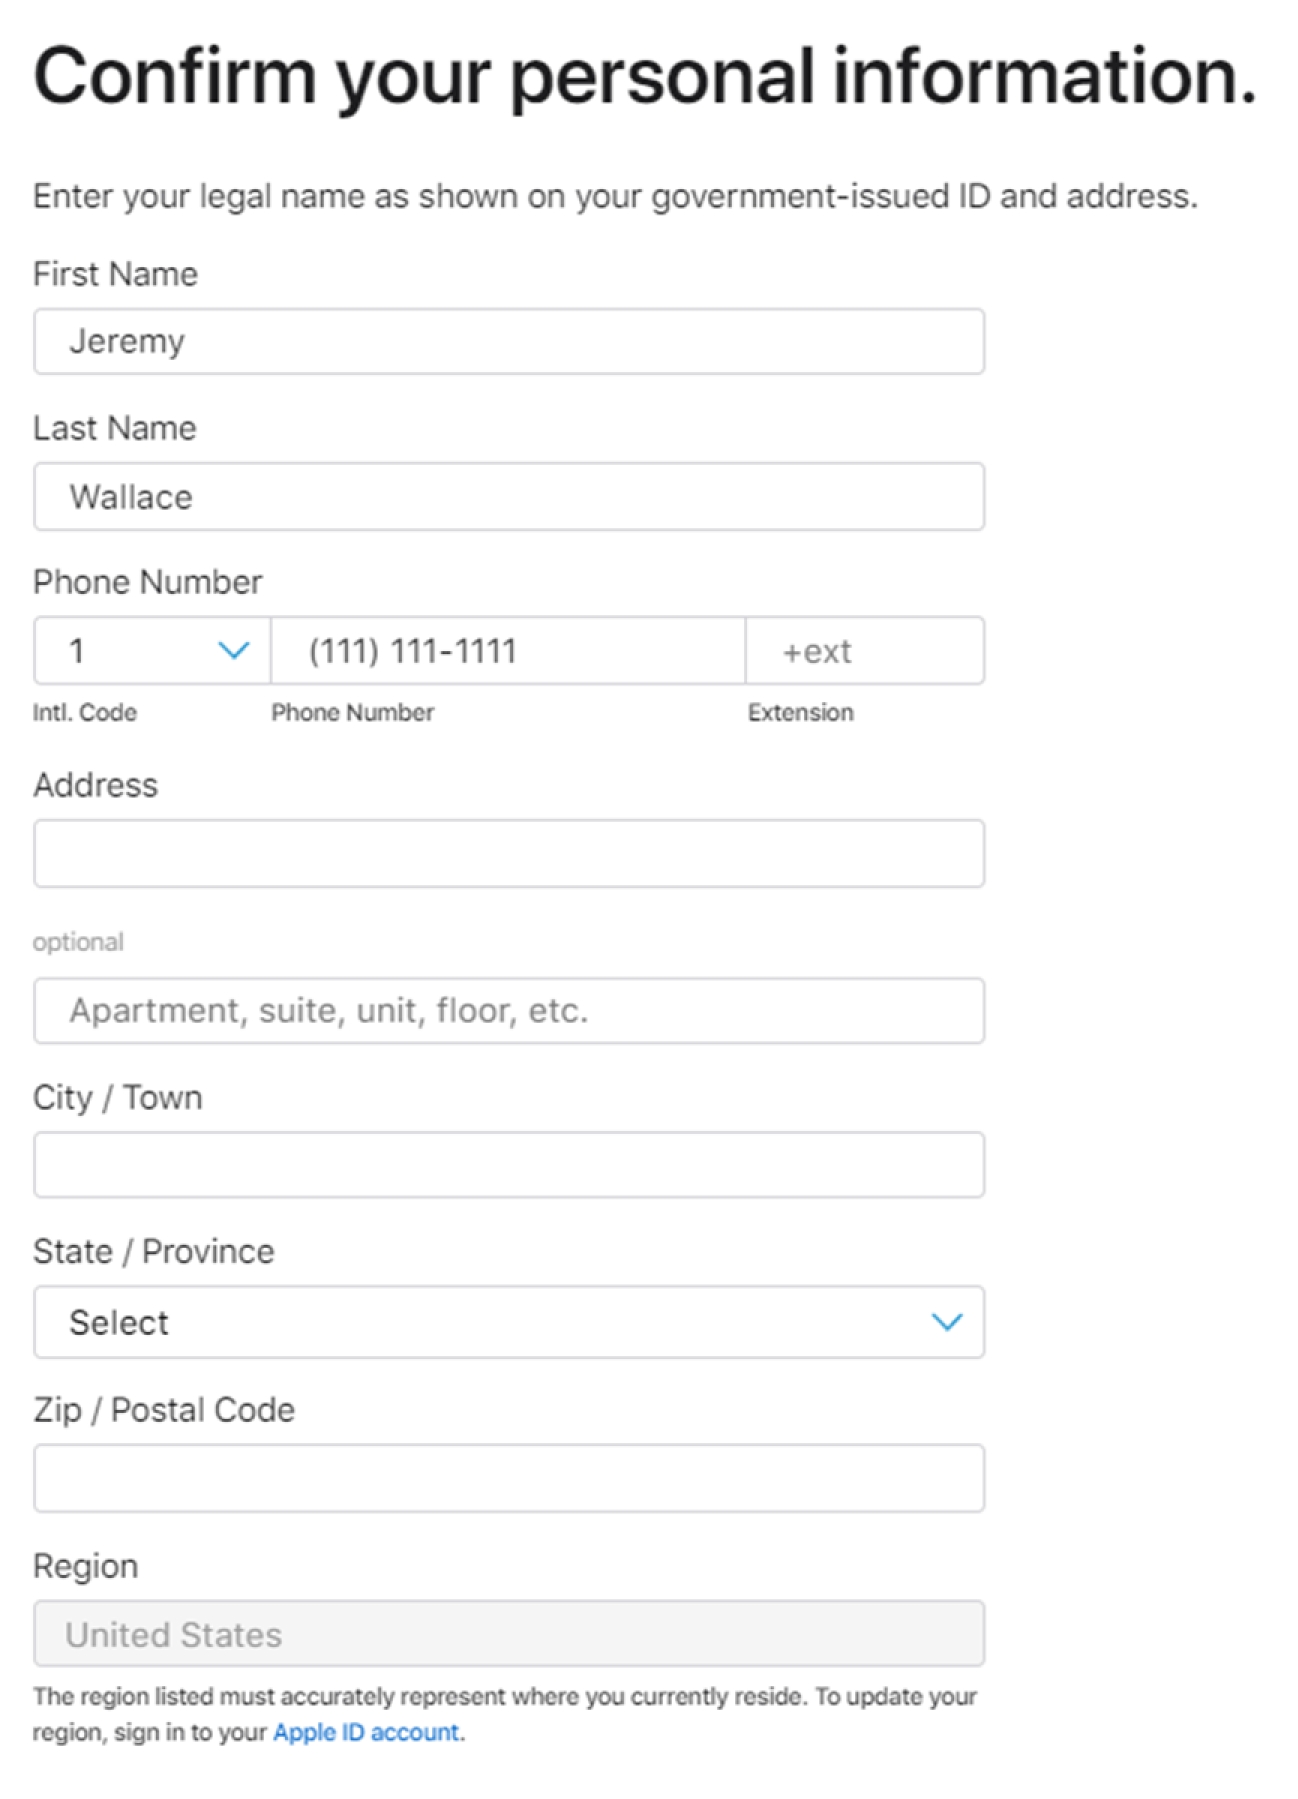
Then it will ask if you want to enroll via the developer app. You may download it or opt for enrolling via the web. (They should be the same, though I have only ever completed enrollment via the web.) Assuming you click ‘continue enrollment on the web’, you’ll be asked to enter your personal information.
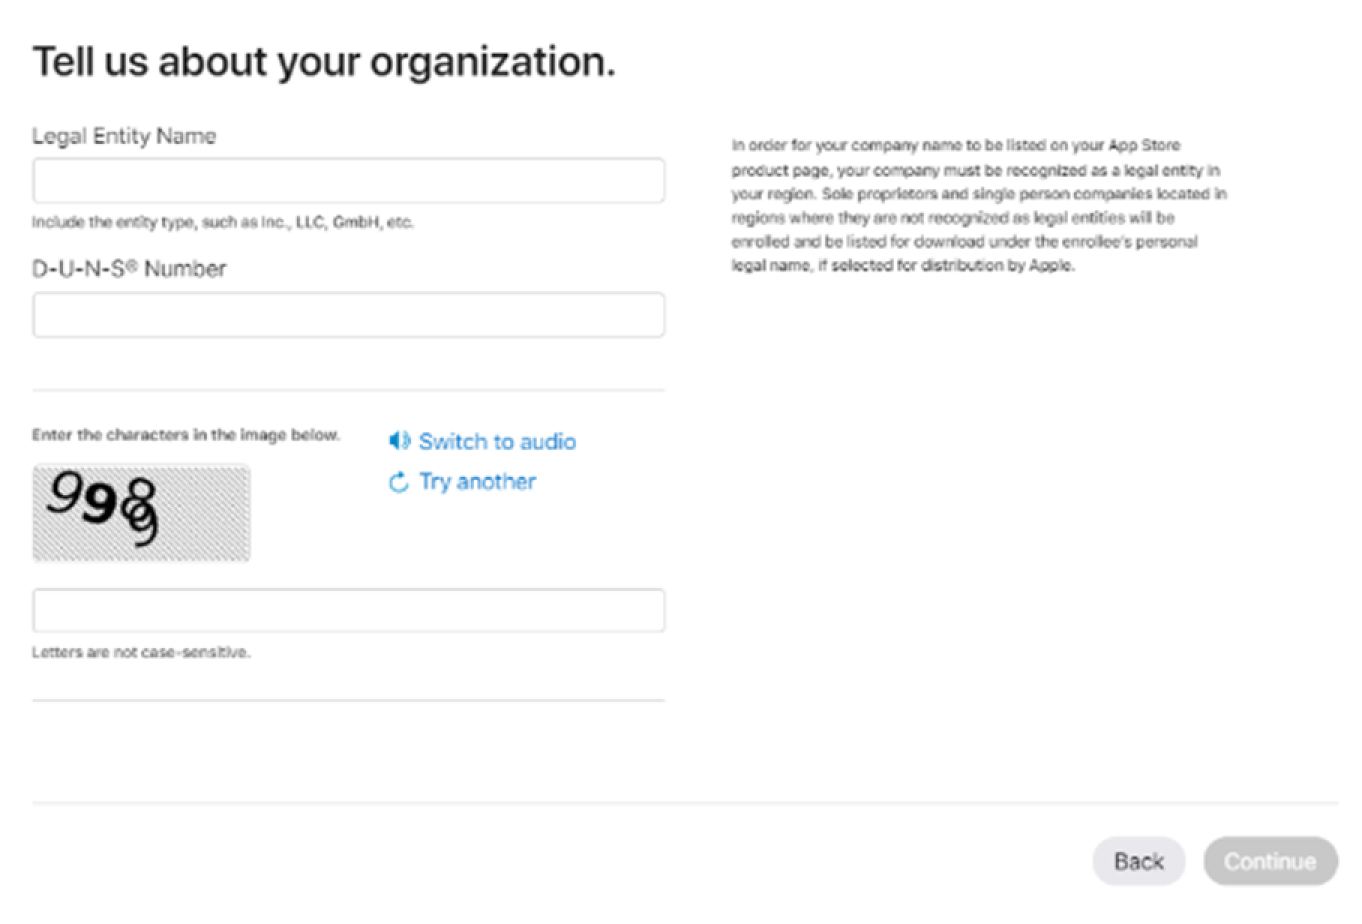
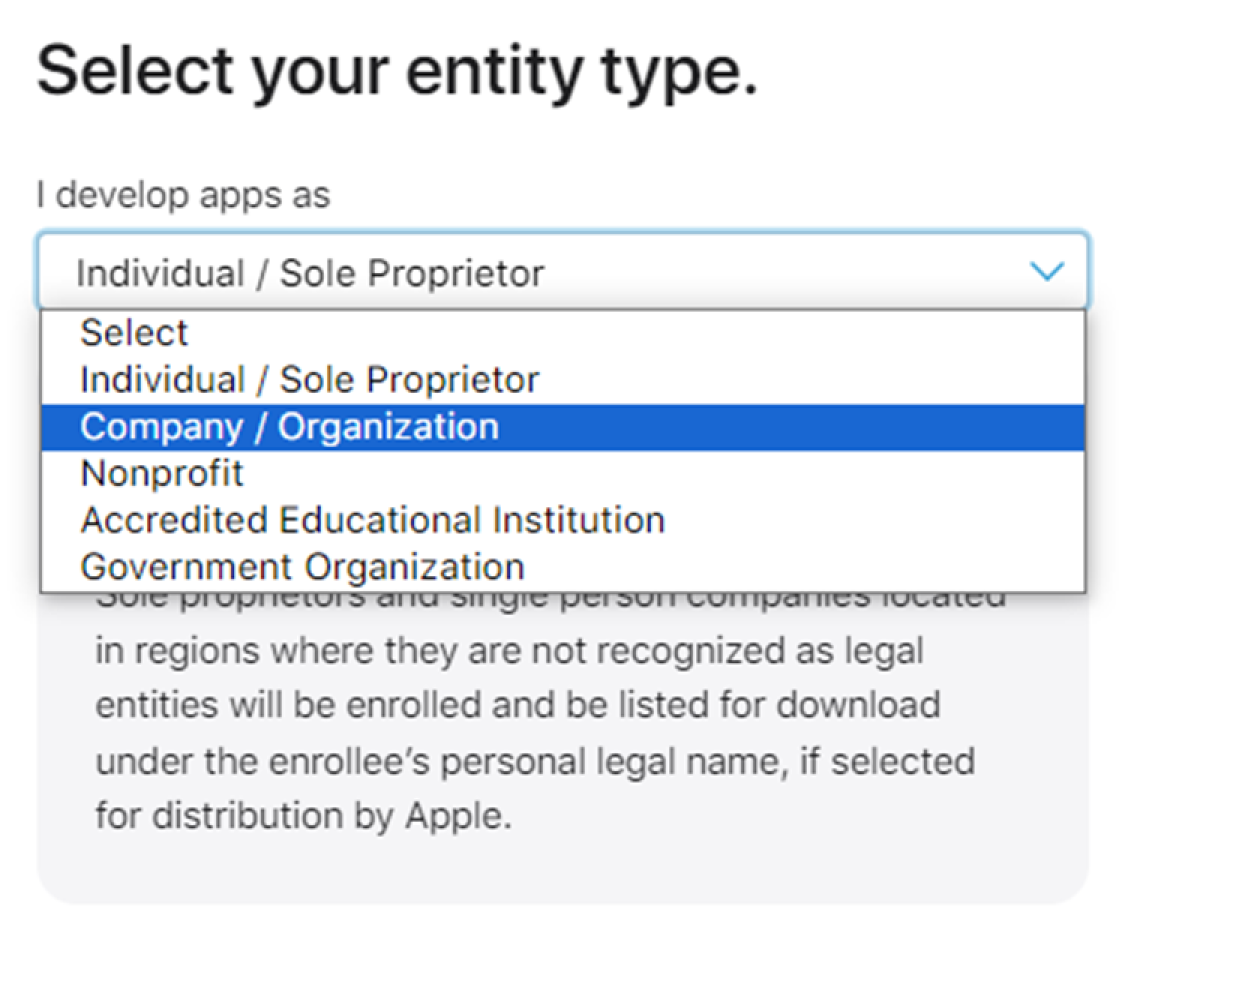
Next, you’ll select your organization type (individual, company/business, nonprofit, government org, or educational institution.) Assuming that you’re a corporation, you’ll then use your entity name and DUNS Number to continue. If your organization is a nonprofit, educational, or government organization, you can request a fee waiver.
Note, you may need to wait to receive an email from Apple saying that your account is verified, which may then prompt you to
sign in on the same device you initially used for enrollment. You should be able to click 'Continue Enrollment'.
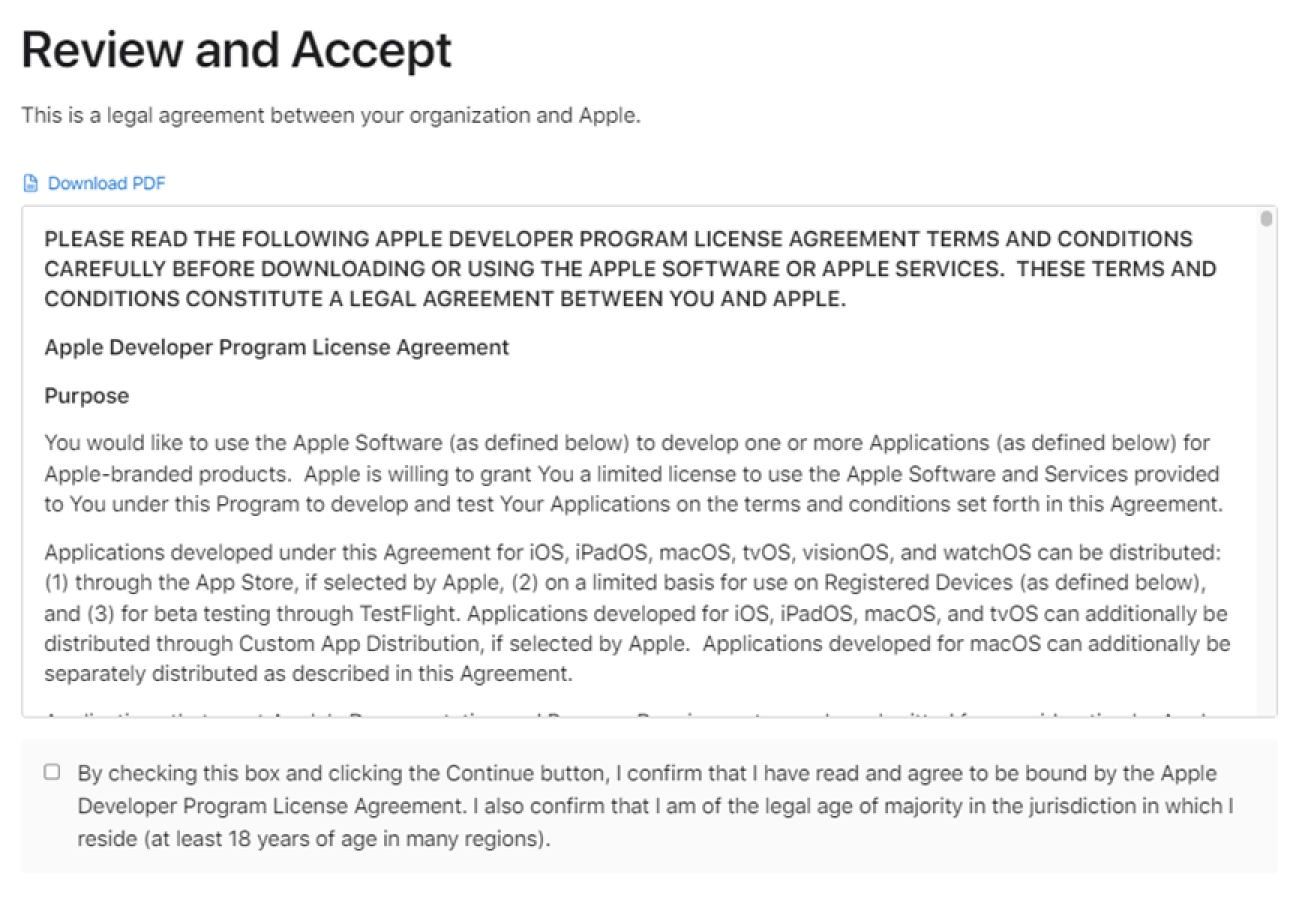
Whether you need to wait for Apple to send an email, or whether you continue immediately, you’ll next review the terms and conditions.
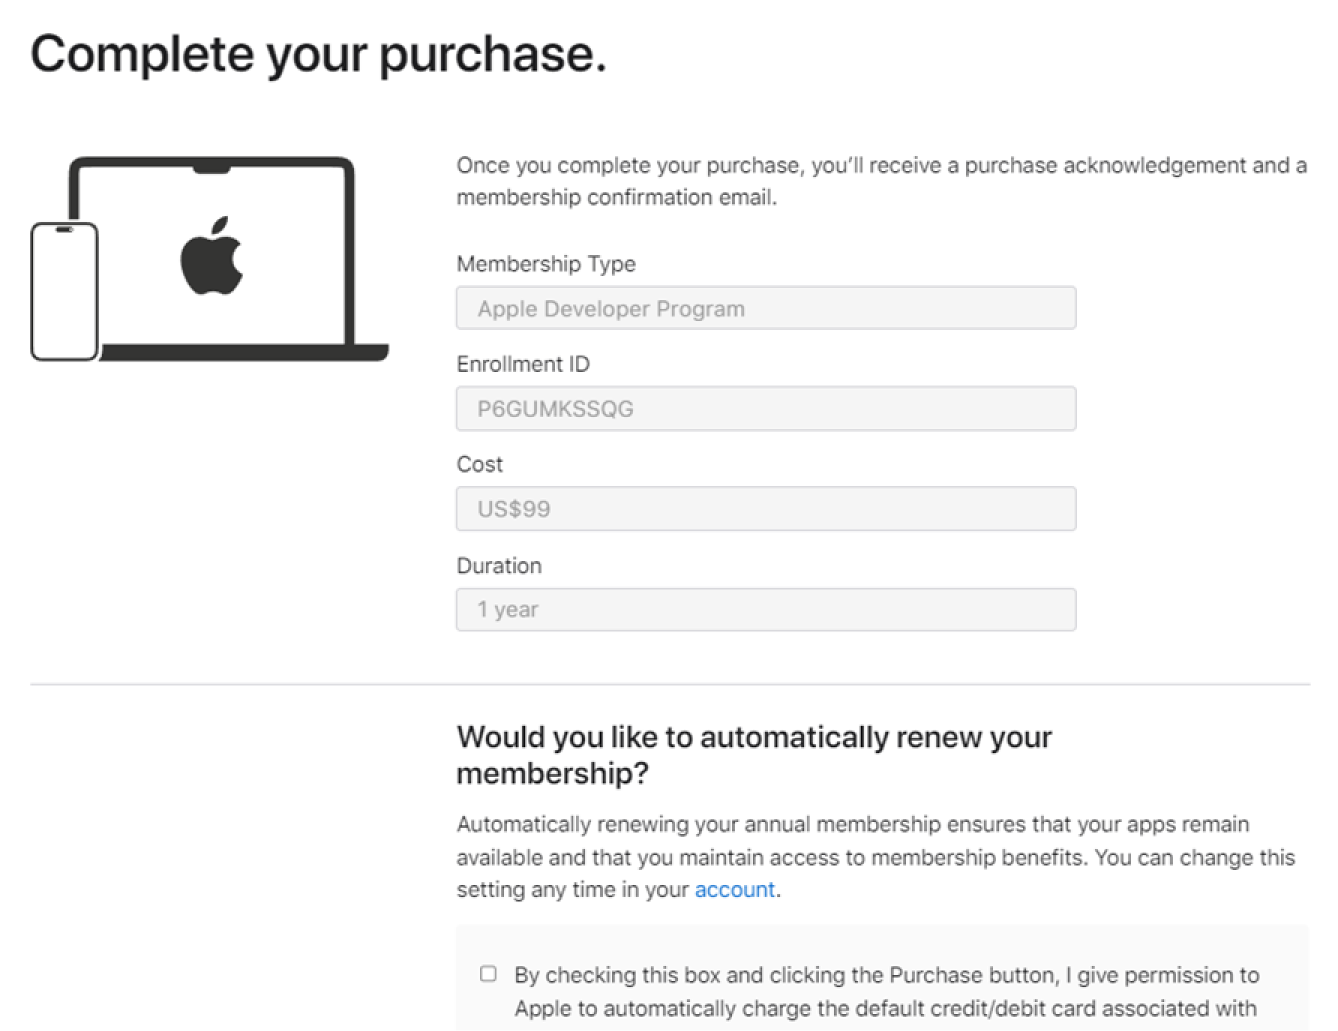
Apple does require an annual membership. You can choose to have the subscription renew itself (or not) according to your preferences.
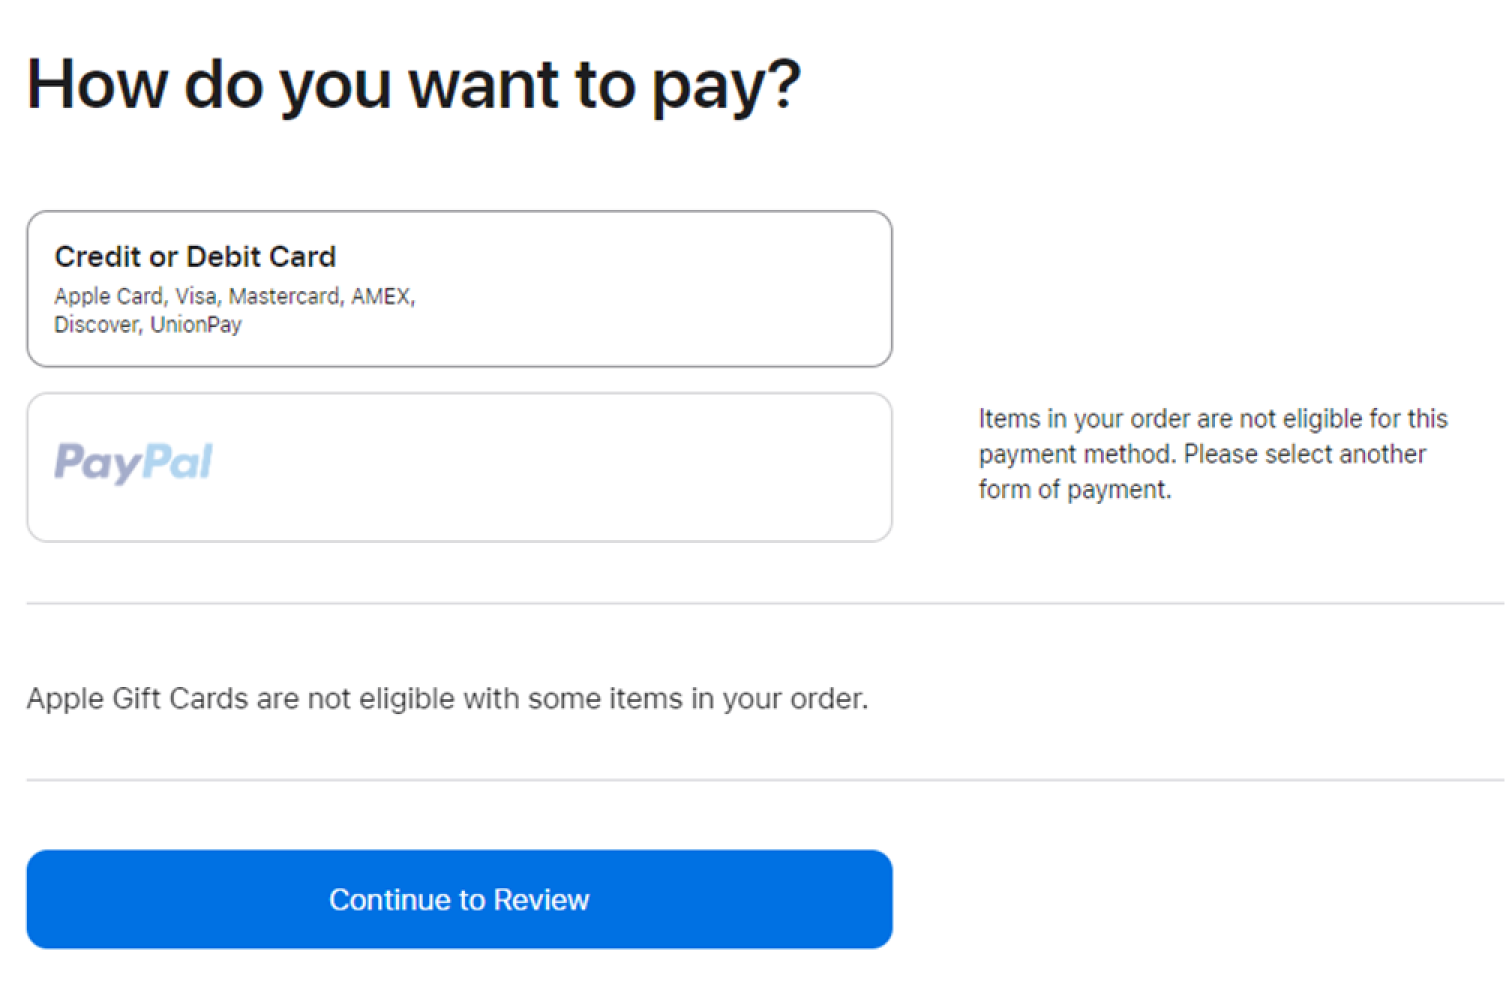
Now you're required to pay your first annual $99 fee for being part of the Apple Developer program. Credit Card and PayPal are available payment options.
How much time should I allow for the verification process? Official documentation says to contact Apple if you haven’t received member confirmation within 24 hours, but there are complaints from some users that it’s taken days and sometimes even weeks for their membership to be verified, though often this occurs in nations other than the USA. Whatever the case, there will be at least a short break between creating your development account and continuing down the path to release your app.
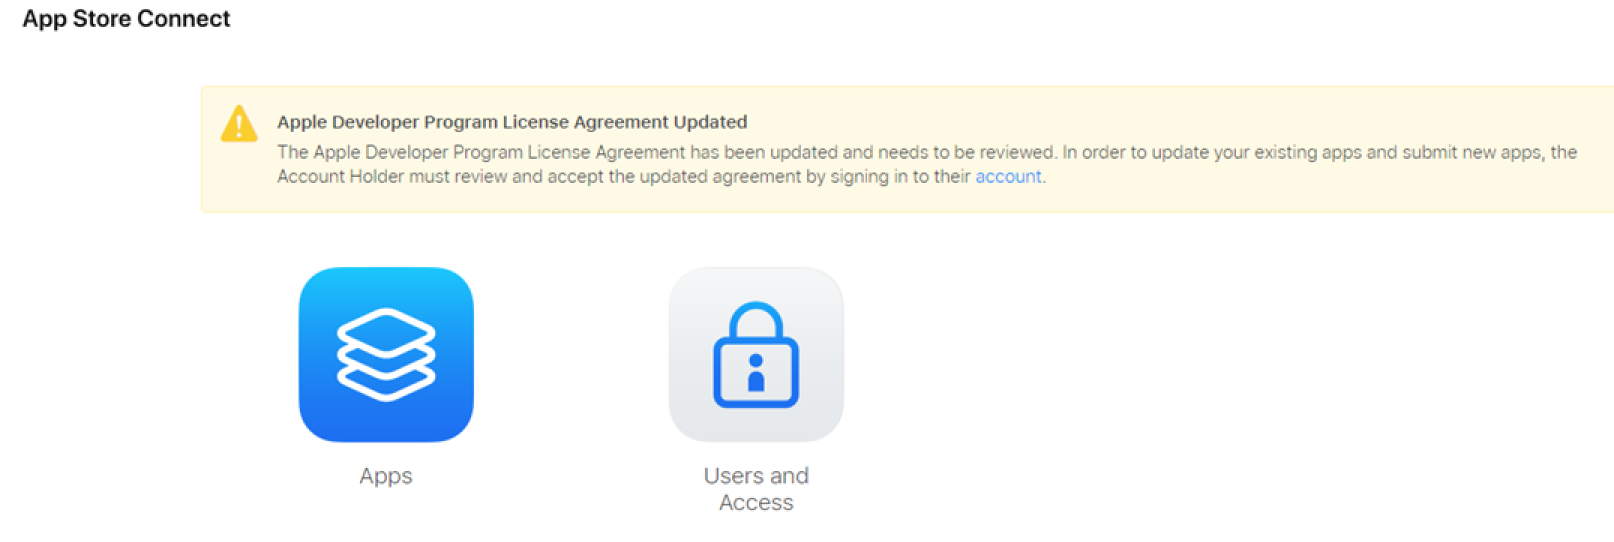
Once you’ve set up your app store account and have been verified by Apple, you can log in and click the large ‘Apps’ icon, followed by the blue plus button to add a ‘new app’. At this point you’ll begin setting up your app release.
Setting Up Your App Release
Here's what you'll need before you begin your app release:
1. App name and subtitle
2. An SKU (a unique id for your app)
3. BundleID (needs to match the ID used in Xcode. Note that this can't be changed after uploading the first build) If you don’t have an existing BundleID, you’ll need to make one
here.
4. A link to your privacy policy (meaning you may need to create one on your website!)
5. Knowledge about what data you're collecting in the app (Name, email, photos, user/device ID, crash analytics, etc.) This may necessitate
6. Know whether your app contains, shows, or accesses third-party content.
7. Select the category and sub-category for your app
8. Consider a support URL and decide on your versioning strategy.
9. A test account email and password so the App store can do its testing
10. The person who should be contacted
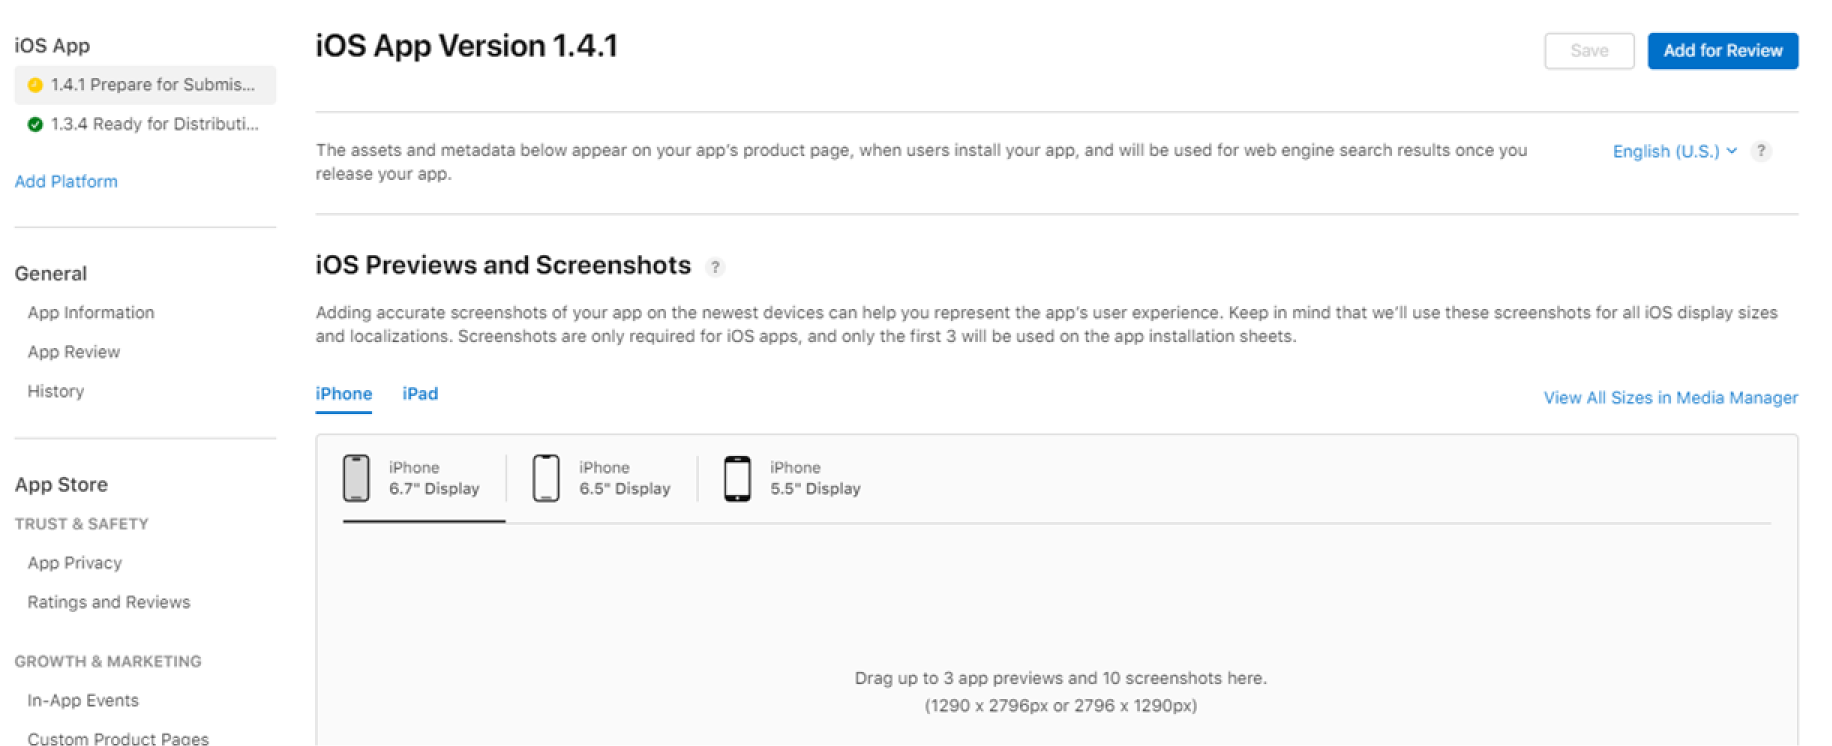
11. Screenshots (6.7" display which is 1290x2797px, and 5.5" display which is 1242x2280px. Landscape orientation with the same aspect ratio is also permitted. You can get screenshots directly from the app while it’s running in the Xcode emulator.)
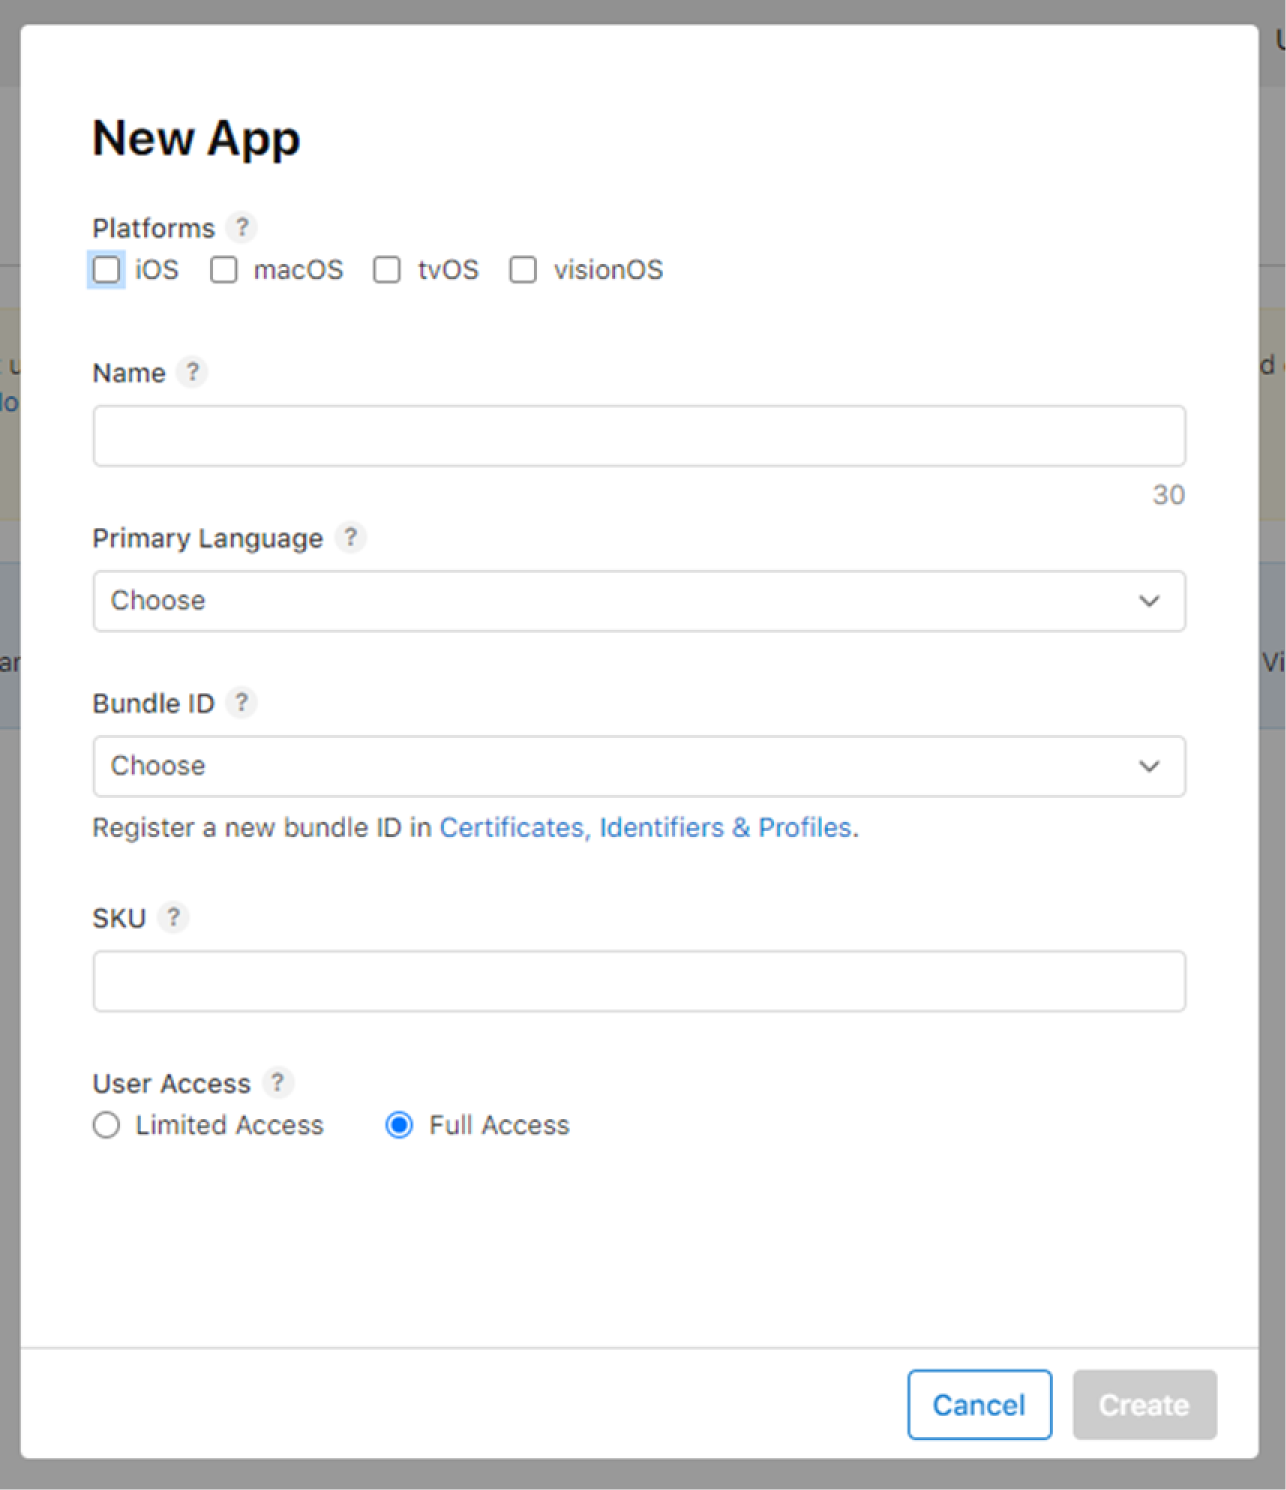
The blue plus button will bring up the following popup where you will select the supported platforms, the name of the app (this will be public facing), the primary language, the BundleID (if you don’t have any options in the dropdown, you’ll need to create a Bundle ID.) Note that the app name needs to be unique across the app store.
You’ll also enter your SKU, a unique (but private) identifier, as well as selecting the User Access level. You can switch the User Access later if you’d like in the App Information tab of your dashboard that you’ll be able to view once the app is created. The limited access feature can be useful if you have an organization where you only want a certain department to be able to download the app.
Once you click ‘Create’, you can select the new listing and begin filling out the release. You’ll need to upload at least three screenshots for 5.5” and either three for 6.5” or 6.7”. Since 6.7 is the most up-to-date ratio, I’d recommend this over 6.5” though you can upload content for all three sizes if you’d like.
Next, you’ll continue down that same page and enter your app description (which will appear on the app store page), any desired promotional text (text that will appear with the description but that you can change anytime without incrementing the app version and re-releasing), a list of keywords separated by commas that’s under 100 characters (these are words that will bring up your app), a Support URL (the link to your support page), a Marketing URL (a landing page where you’re sharing about your app), a copyright (the year + your business name eg. 2024 MyCompanyName Inc.)
Lastly, you’ll need to choose a version number. Most apps use the major.minor.patch format.
Major = big UI changes / app rewrites / major breaking changes
Minor = feature / new functionality
Patch = minor changes / bug fixes
For example: most apps start with 1.0.0 and then any bug fixes released after that point would increment the version to 1.0.1, and any smaller feature updates would increment to 1.1.0. Then, any major releases would increment the version to 2.0.0 (note that when a number increments, any numbers to the right always reset to zero).
Of course, if you have reason to depart from these suggestions, the app store doesn’t enforce these standards. So, if you have a few new features and want to increment the major number as opposed to the minor because it is more advantageous for marketing to promote a new version, you certainly can.
Next, add the build version. This file is generated via Xcode, so contact your development team.
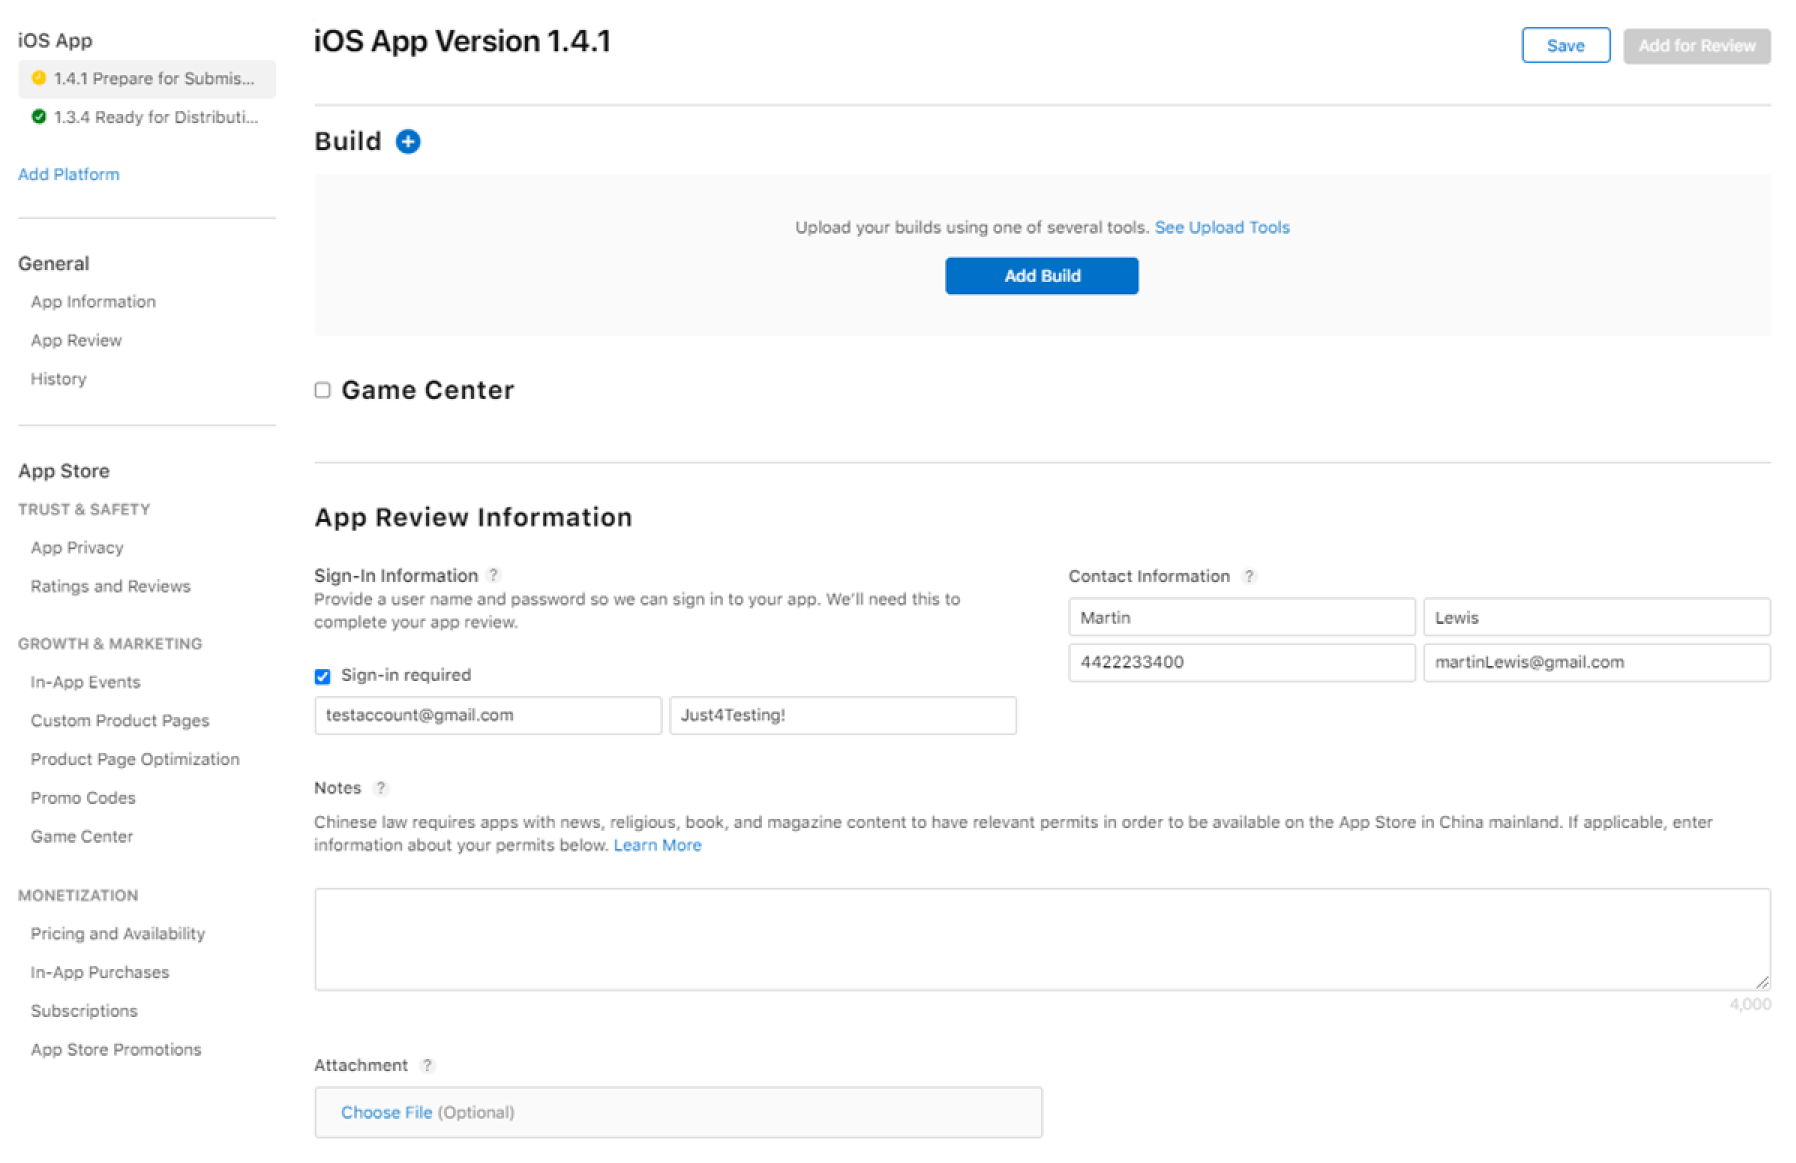
Below that section is the App Review information section. In order to approve your app, Apple employees sign in to your app and double check that it is what you say it is to maintain integrity on the platform. Because of this, if your app requires you to log in, you must provide them login information for a pre-created account as well as contact information for the person who will be notified of any issues with the app verification process. You can include any notes for the reviewers that you wish.
You can then select when the app store version will be released. If you have a specific day in mind, make sure to select ‘Manually release this version’, or else it will automatically be released as soon as it is approved.
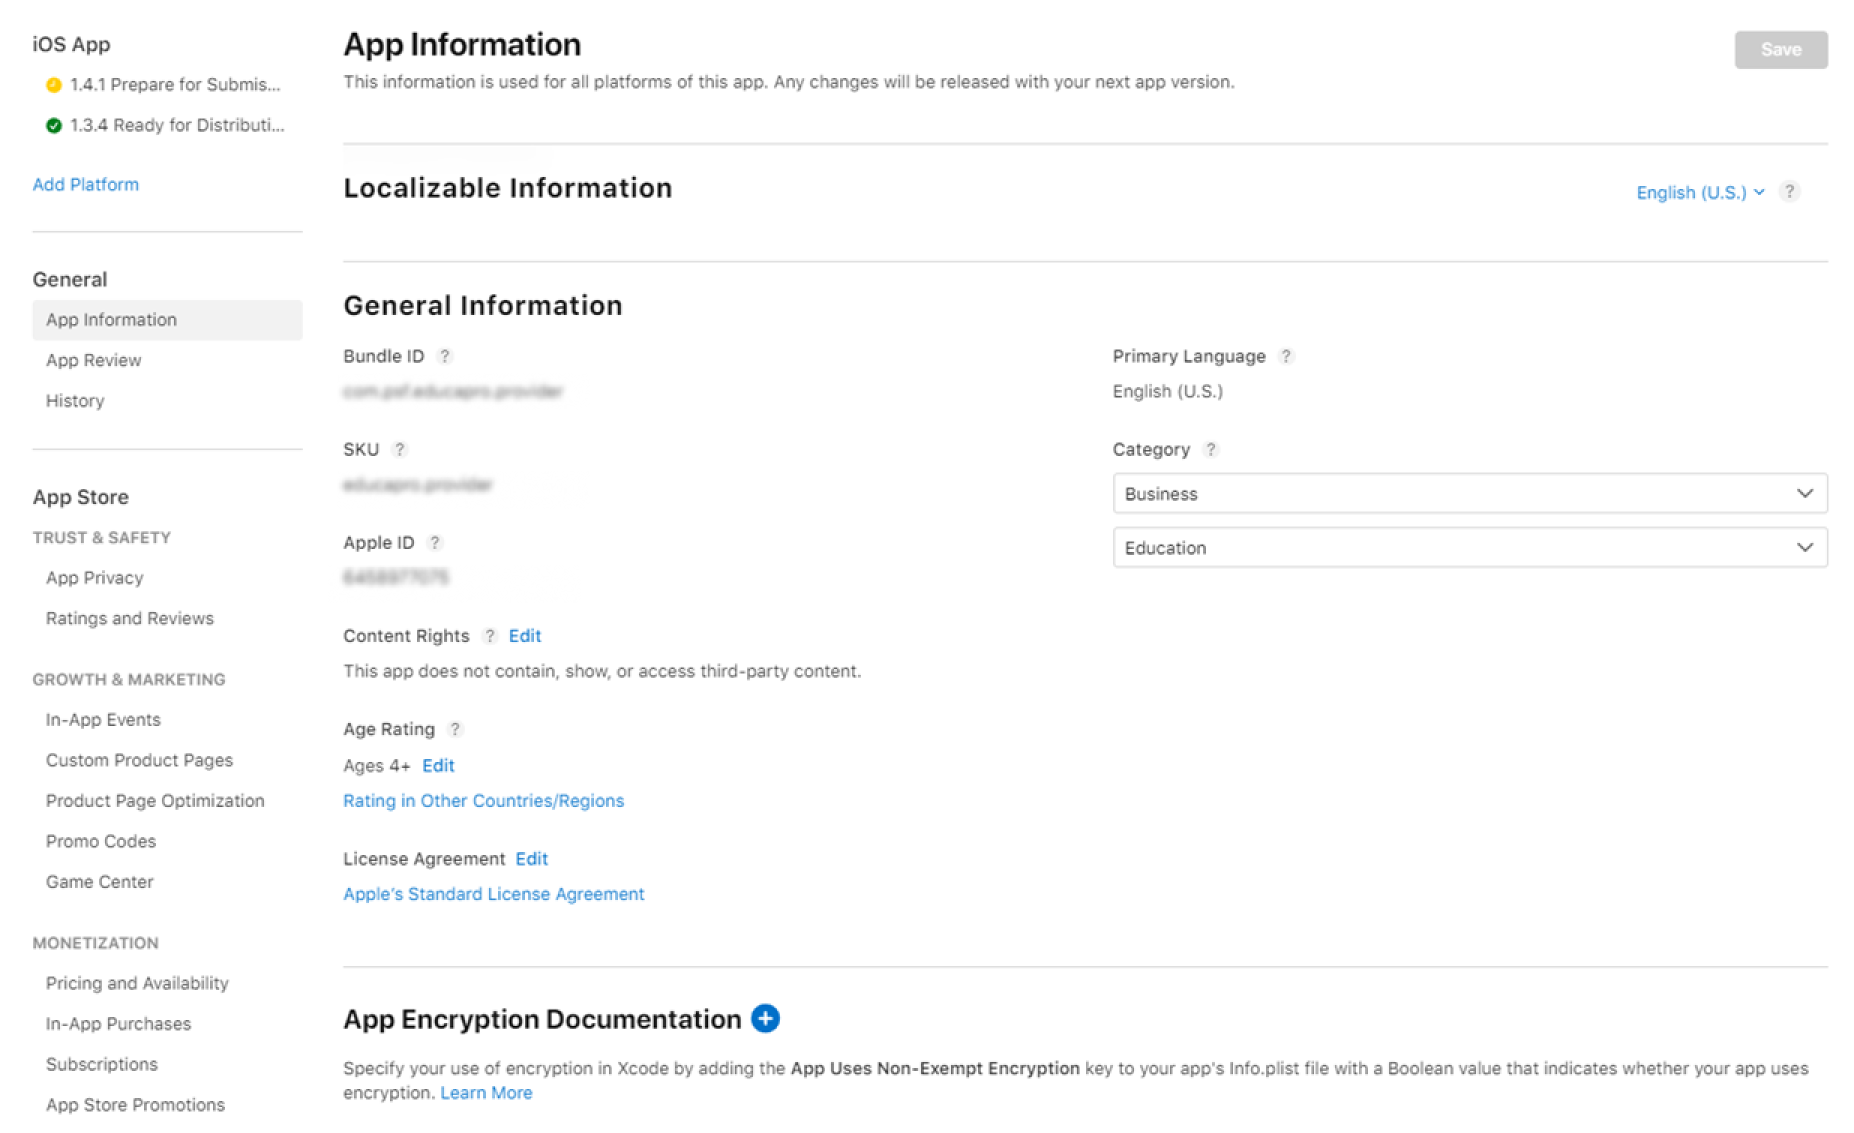
Next, navigate in the left-hand panel to ‘App Information’ and edit the Age Rating section. Even if you’re an app that’s not geared toward children, this is basically a ‘mature content’ rating, so likely your app will be rated 4+ if it’s a business app despite the fact that 4 and 5-year-olds will not be downloading your app.
You’ll also need to choose your app category and sub-category. Skim the options and select the one that best fits your app. It’s okay if it’s approximate.
Next, you must edit the Content Rights. If your app uses 3rd party content, you must indicate that here. You can leave the default licensing agreement. This is also where App encryption is located if that’s something you’re using.
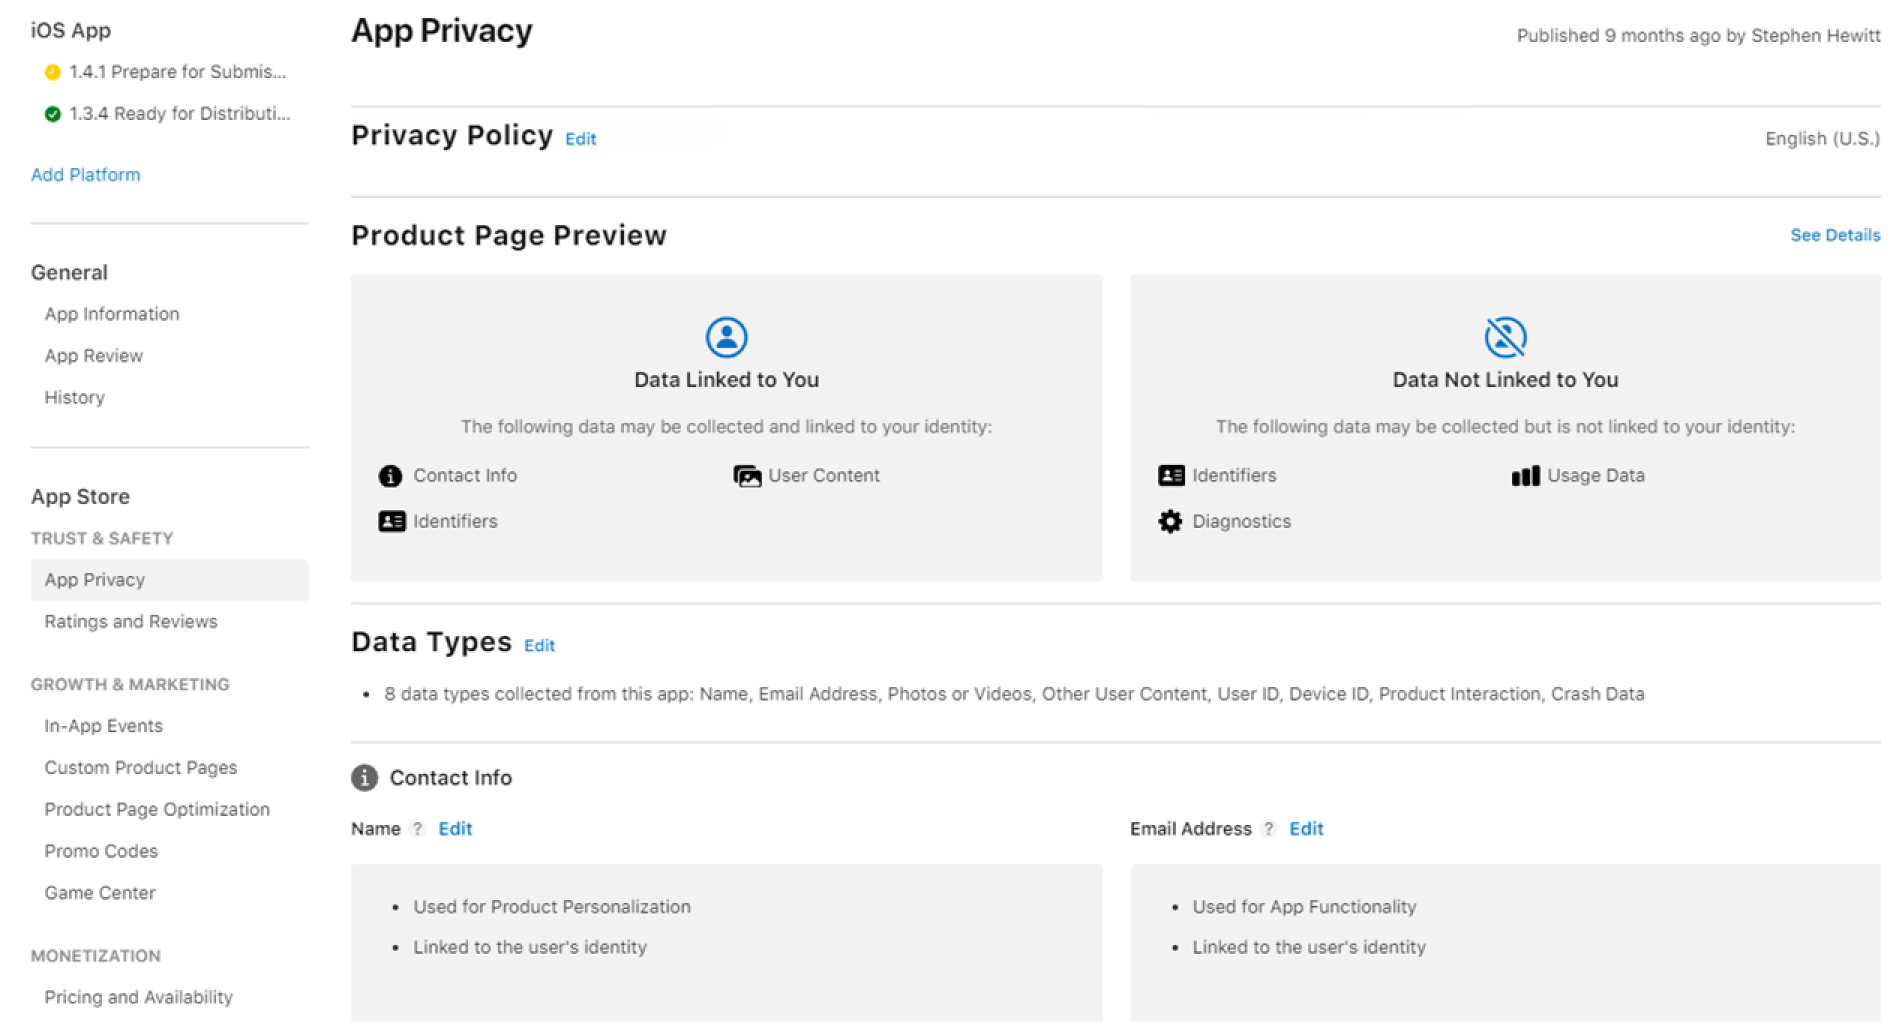
Then, navigate to the ‘App Privacy’ tab and click ‘Edit’ next to the ‘Data Types’ header. This will take you through a series of screens where you must select any data you’re collecting. You can then edit the purpose for each piece of information you’re collecting (the grey boxes below ‘Data Types’). This step is important since app builds often get temporarily rejected due to incomplete data collection information.
Lastly, navigate to ‘Pricing and Availability’ in the left-hand pane and select your price in the ‘price schedule’ section. If your app is free, you still need to complete this step!
If this sounds like a lot, don’t worry. When you navigate back to your submission and click the ‘Add for Review’ button in the upper right corner, the App store will let you know if there’s anything else you’re missing.
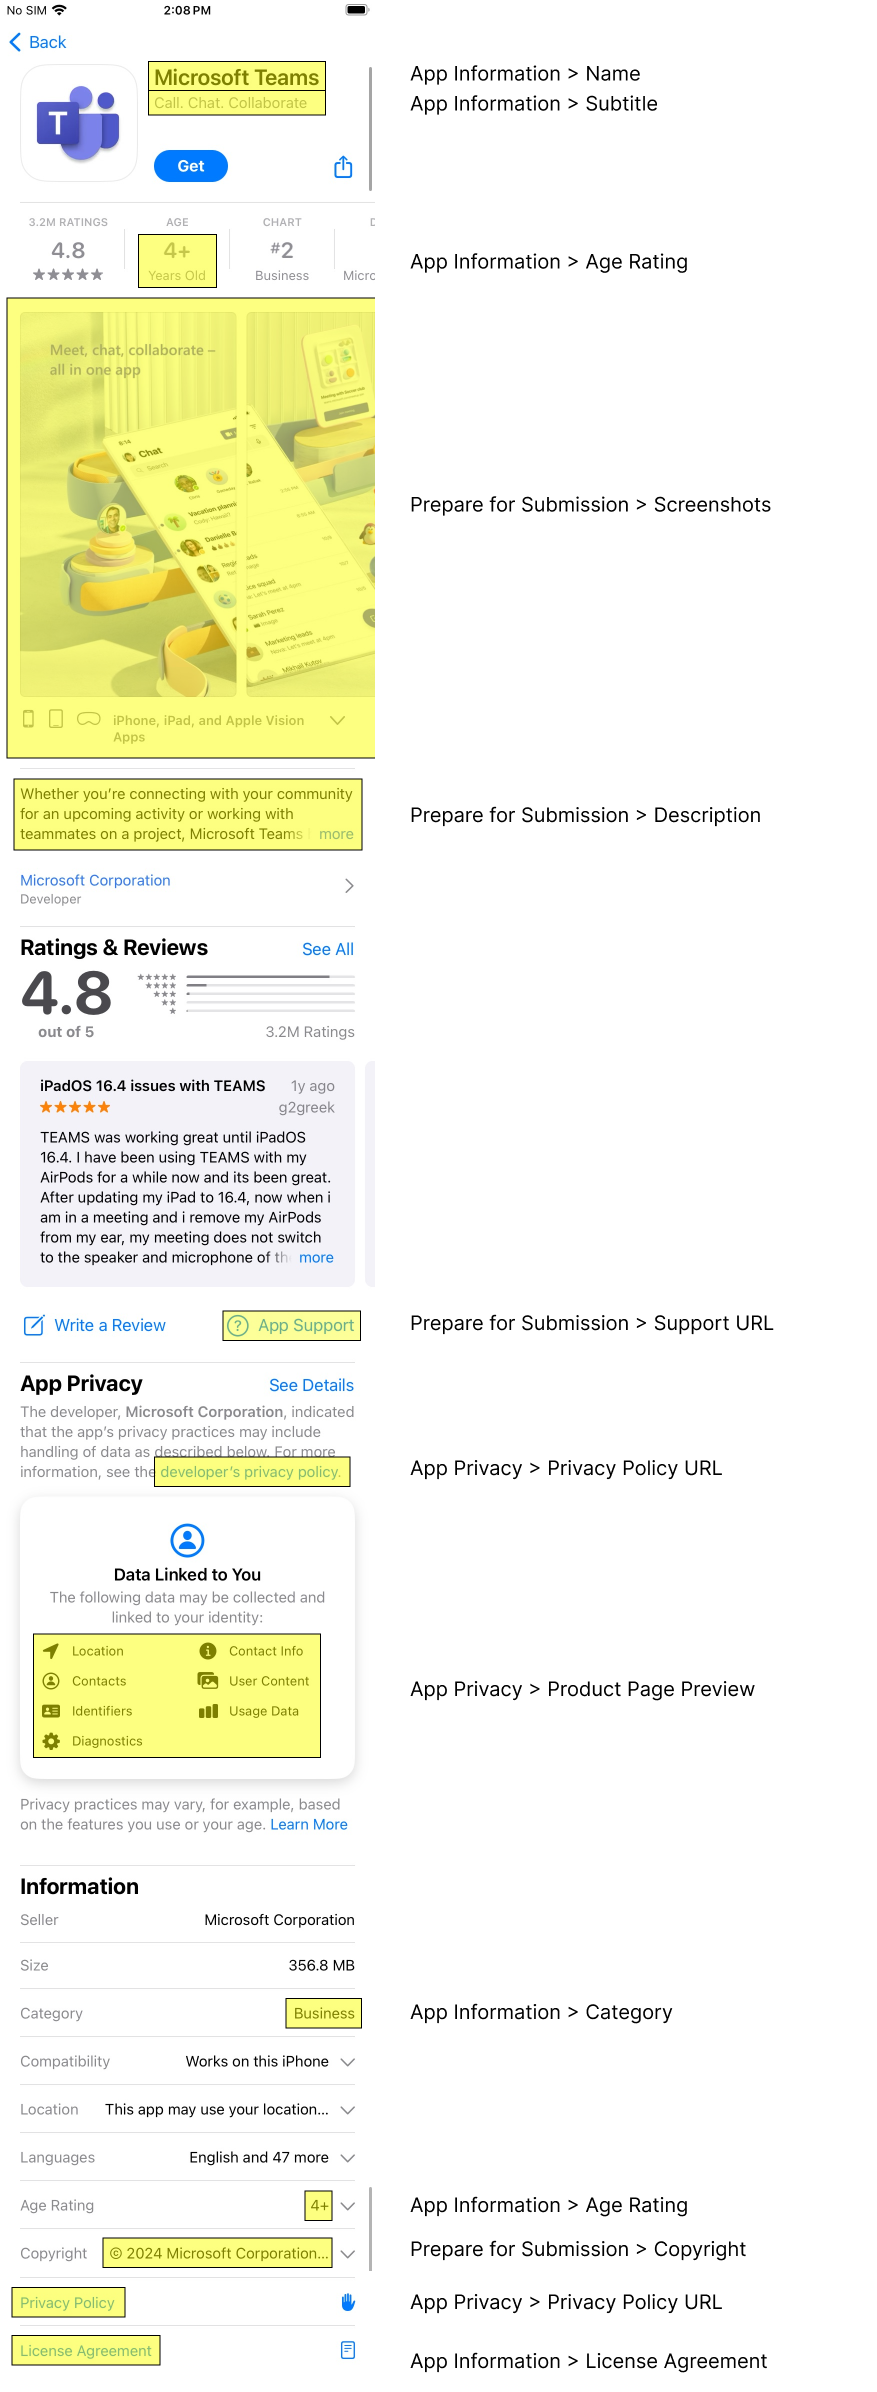
In the meantime, here's a helpful diagram of where all the basic pieces of information you entered will show up in the app store!
Once you’ve submitted your app for review, it’s time to wait. Unfortunately, there’s no guarantee surrounding the amount of time it will take for Apple staff to review your app. Most of the time it happens within 48-72 hours, but if they find any potential issues, you may need to make a few changes and resubmit. In all, it’s generally wise to allow a week or two before your release date, especially if you have significant marketing efforts counting on a specific release date.
Happy app store-ing!

